

Sources:
https://www.instructables.com
https://outgrilling.com/
https://www.instructables.com/keyhole-garden-using-reclaimed-materials/
https://www.instructables.com
https://outgrilling.com/
https://www.instructables.com/keyhole-garden-using-reclaimed-materials/


Intro: Keyhole garden using reclaimed materials
I wanted to build a raised garden bed this year and decided that I had enough materials around the homestead to build one. My goal was to build it with little or no cost
using reclaimed materials. I found a spot near my greenhouse that I was also building at the time that looked to be pretty level.
I wanted to build a raised garden bed this year and decided that I had enough materials around the homestead to build one. My goal was to build it with little or no cost
using reclaimed materials. I found a spot near my greenhouse that I was also building at the time that looked to be pretty level.
Step 1: First things first
I wasn't sure how big I wanted to make this, but knowing that I only had a few cement blocks to work with, I decided to go somewhere around 7 or 8 feet. I put a stick in
the ground and tied a piece of bailing twine to it and cut off a length that looked about 8 feet. I then placed a block at the end of the string about every three feet until I had
a perfect circle. I rearranged the blocks to get them to line up and then eye-balled the keyhole part to where it not only looked right, but big enough to be able to work in
there.
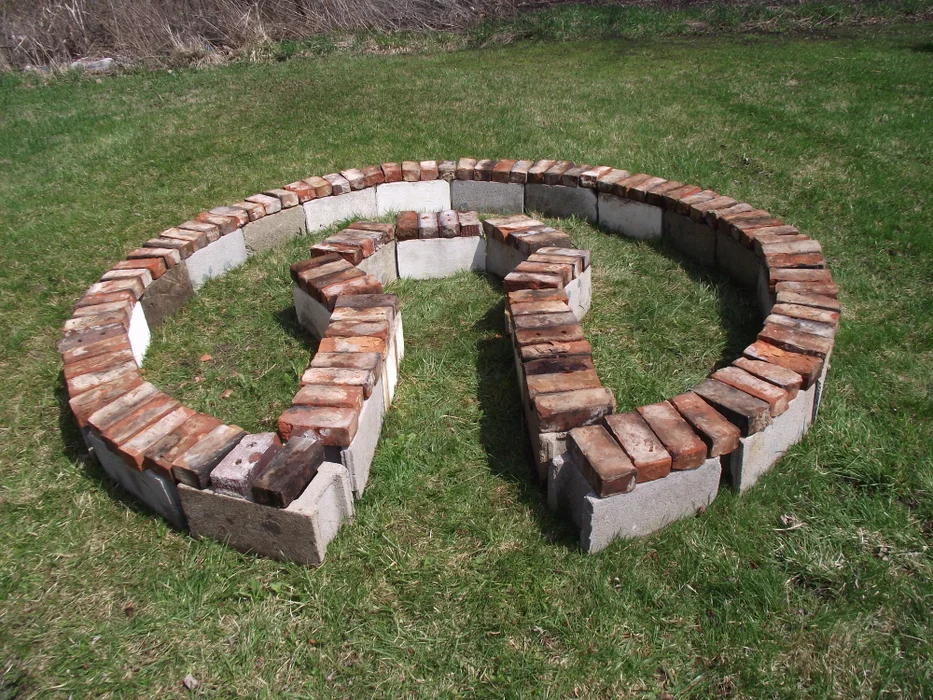
Step 2: Adding a little style to the project
While adding a little style to the project, the reclaimed chimney bricks do give me about another two inches of height to the garden. I would have liked to made them look
a little more professional by maybe giving them a cooler layout, but I'm not really a mason, and have yet to learn. Maybe next year after I get this thing to the preferred
height that I would like, I'll work on my mason skills!
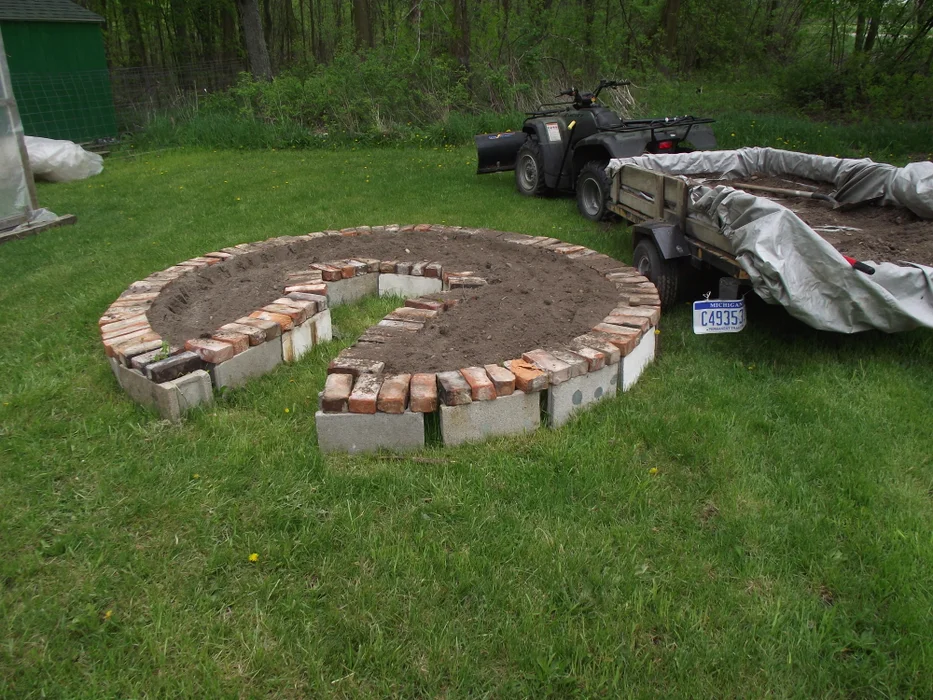
Step 3: Black gold
My friend and neighbor who is a dairy farmer is in the process of expanding his barn by adding free stalls. They had excavated a large area in what was the old barnyard
in order to build the addition. I knew even before I started this project that I would have access to as much of this black gold I wanted! I only needed one trailer load,
which isn't very much I would guess it to be maybe a yard. This stuff is awesome and I cant wait to see what kind of production I'm going to get out of this project.
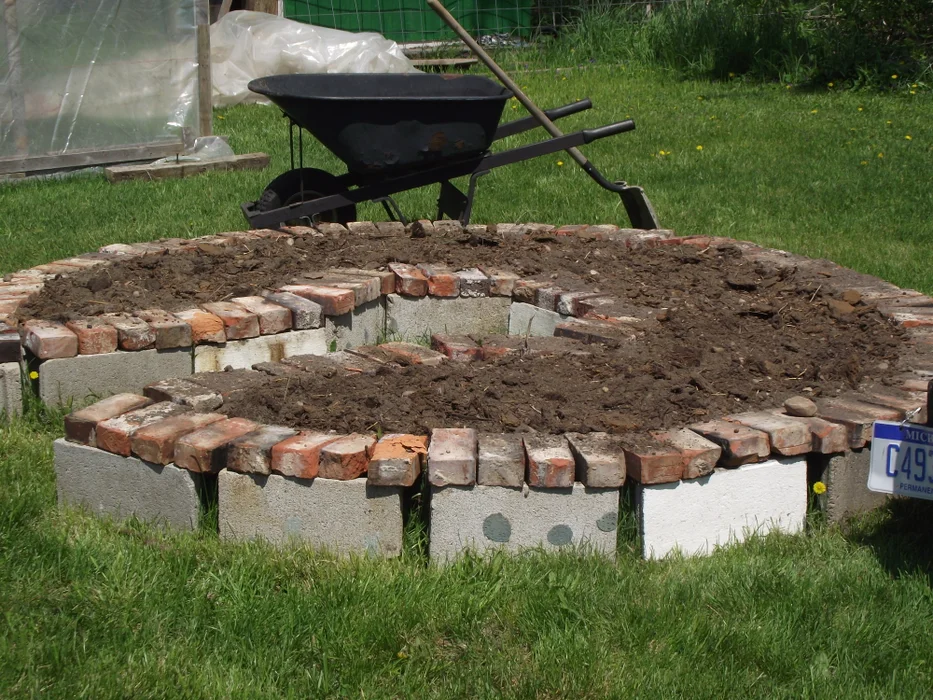
Step 4: The top layer
Even though the barnyard dirt is rich with nutrients, I decided that I would make use of some old goat and sheep manure that we had in one of our pens. this stuff is
probably three years old, and seemed to be really clean. By clean I mean that there were no weeds or other grasses growing in it. I'm hoping that I won't have to worry
too much about fertilizing or weeding this summer.
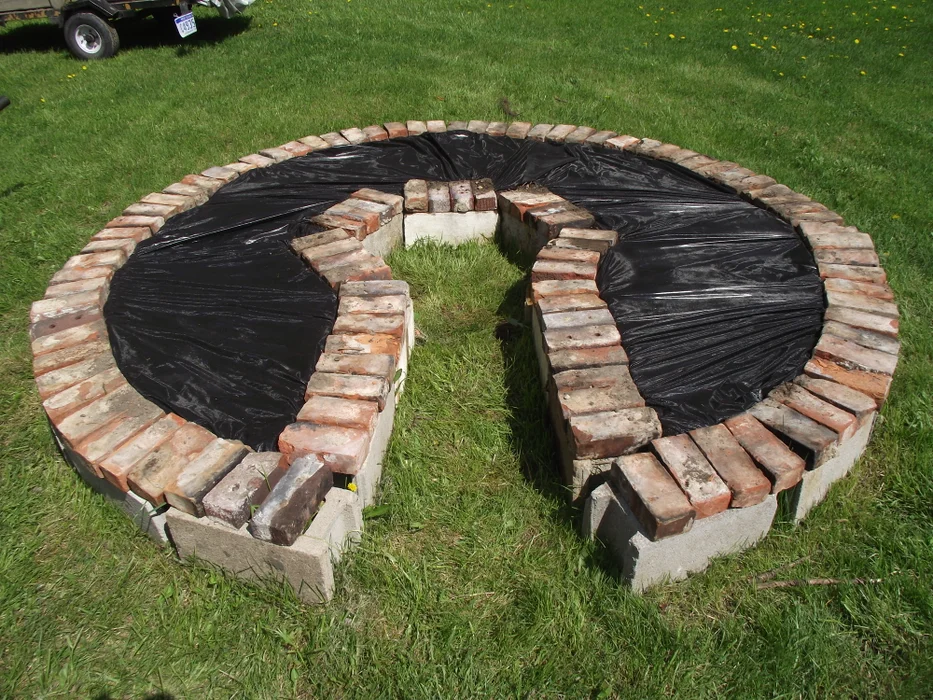
Step 5: Cover charge
I decided that with all of the fresh nutrient loaded dirt that I put into this garden, it would be wise to install a weed barrier. I had a leftover roll from a flower bed project that
I did last year, and decided that this would be a good place to make use of at least some of it. The bricks that I had placed on top of the cement blocks for "looks" actually
had a hidden function, that of which is to help hold in place this material. Usually when you apply this material, you need to insert spikes or some twigs to anchor it in
place. I simply slid the bricks back about three inches and then put the fabric in place, and slid the bricks back on top of them wedging the fabric between the bricks and
the cement blocks.
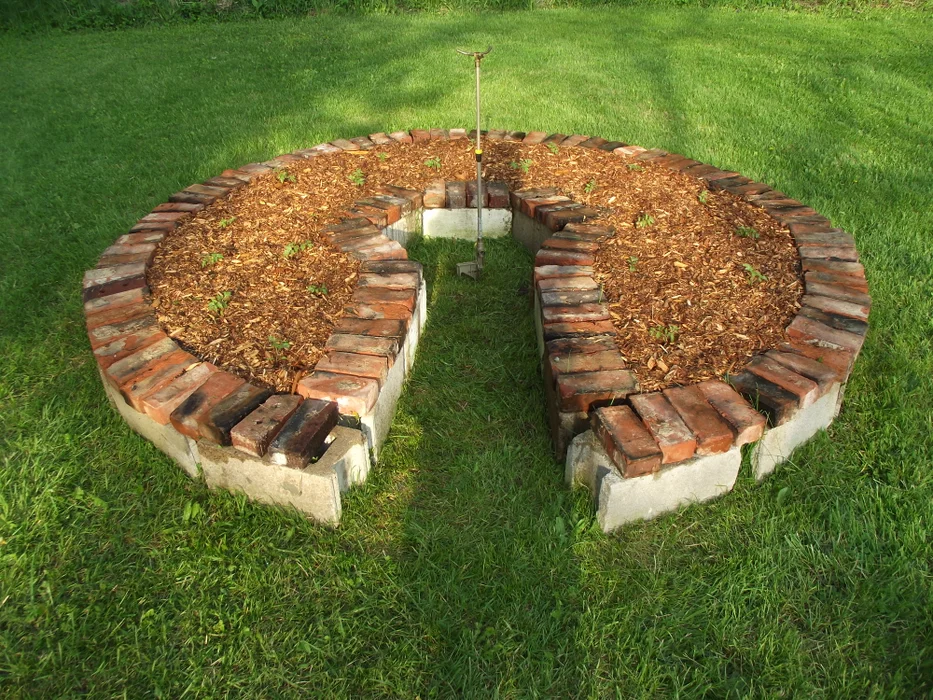
Step 6: The finished product
After I got done with the plantings, I again decided that I needed something else. I decided that some cedar mulch would do just the trick. I invested in a bag, which gave
me more than what I needed. it was on sale at menards for 2.49. so the investment was minimal. Although it does add that finishing touch, it will also give a hand to the
weed barrier in stopping weeds from coming up, and will also help to hold in moisture, making watering less frequent. I planted 22 Roma tomato plants in here, and
although they are a little tight in spacing, I think they will be ok. I was originally going to make this a salsa garden, planting tomatoes, peppers, onions, and some type of
hot pepper, but time was not on my side, as I started these plants inside in late march, and they were growing so fast in my containers, that I needed to find them a home
quick. so here they are. And this is my version of a keyhole garden. simple yet functional and on the cheap with not a whole lot of time or money invested. not to mention
it does add a little bit of something to the yard.
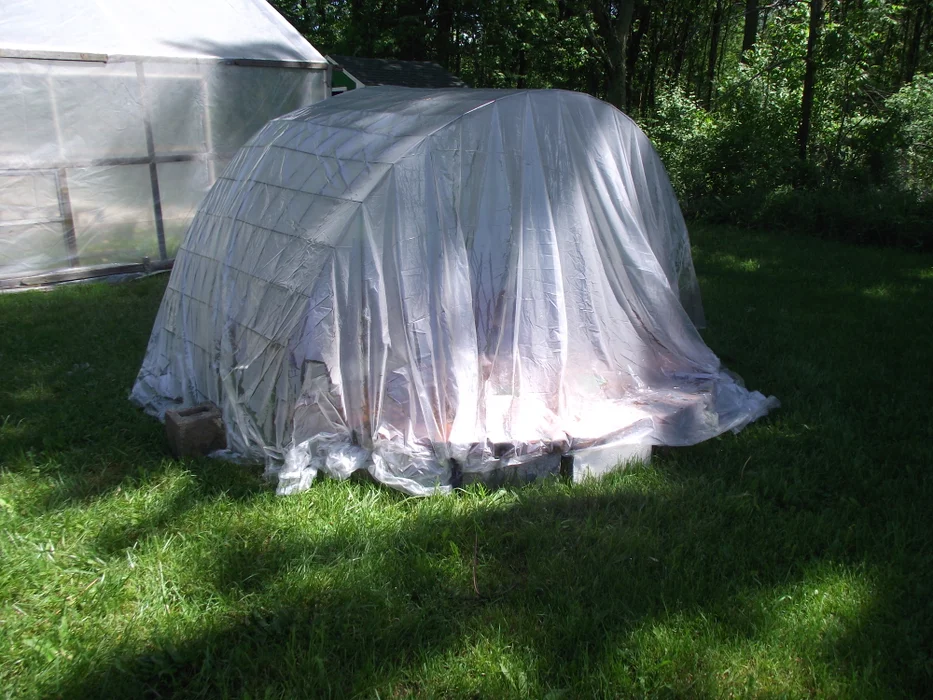
Step 7: Frosty Morning
just an update: We have a frost/freeze warning for tonight and I used a section of cow panel and some leftover thin plastic I used to winterize our windows in the house. It took about five minutes to get this covered up. everything survived and all is well.
just an update: We have a frost/freeze warning for tonight and I used a section of cow panel and some leftover thin plastic I used to winterize our windows in the house. It took about five minutes to get this covered up. everything survived and all is well.
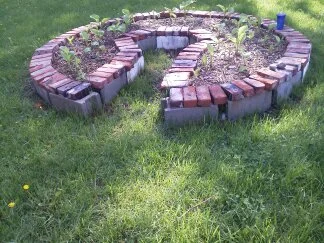
Step 8: Winter Guest
This is just an update on this project. The Tomato plants that I grew last year turned out really great. I don't have any pics of them because I had stored them on my laptop and it crashed bad and lost everything. lesson learned not to do that again. I now have a flash drive :) Anyway, I had a few Hasta plants and I had dug them up last fall and divided them up and put them in here to overwinter, then this spring when they all came up, I dug them out and gave about half away to family and the rest I replanted as edging around part of the garden. Here is what they looked like as they awakened after a long and harsh winter.
This is just an update on this project. The Tomato plants that I grew last year turned out really great. I don't have any pics of them because I had stored them on my laptop and it crashed bad and lost everything. lesson learned not to do that again. I now have a flash drive :) Anyway, I had a few Hasta plants and I had dug them up last fall and divided them up and put them in here to overwinter, then this spring when they all came up, I dug them out and gave about half away to family and the rest I replanted as edging around part of the garden. Here is what they looked like as they awakened after a long and harsh winter.
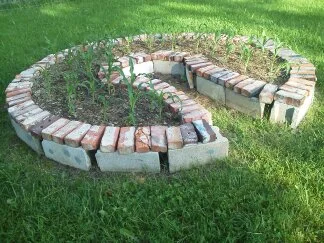
Step 9: This Years Crop 2014
After digging up all the Hasta's the bed was ready for this years new tenants, Sweet corn! I started all of my seed in a small greenhouse that I put together this spring. I'm going to do an instructable on how I did that in the very near future. I had no problems whatsoever last year. Very little maintenance as far as weeds were concerned, by putting down a weed barrier along with some mulch, I really didn't have to do a whole lot except for the occasional weed that would pop up through were the hole was for the plant, and really just watered about once or twice a week lightly just to keep the soil from drying out. Also I didn't have any real issues with grass or weeds coming up in and around the cinder blocks, what little that did manage to the weed whacker took care of that easily. I'll post pics throughout the growing season so we can see how the sweet corn does this summer.
After digging up all the Hasta's the bed was ready for this years new tenants, Sweet corn! I started all of my seed in a small greenhouse that I put together this spring. I'm going to do an instructable on how I did that in the very near future. I had no problems whatsoever last year. Very little maintenance as far as weeds were concerned, by putting down a weed barrier along with some mulch, I really didn't have to do a whole lot except for the occasional weed that would pop up through were the hole was for the plant, and really just watered about once or twice a week lightly just to keep the soil from drying out. Also I didn't have any real issues with grass or weeds coming up in and around the cinder blocks, what little that did manage to the weed whacker took care of that easily. I'll post pics throughout the growing season so we can see how the sweet corn does this summer.
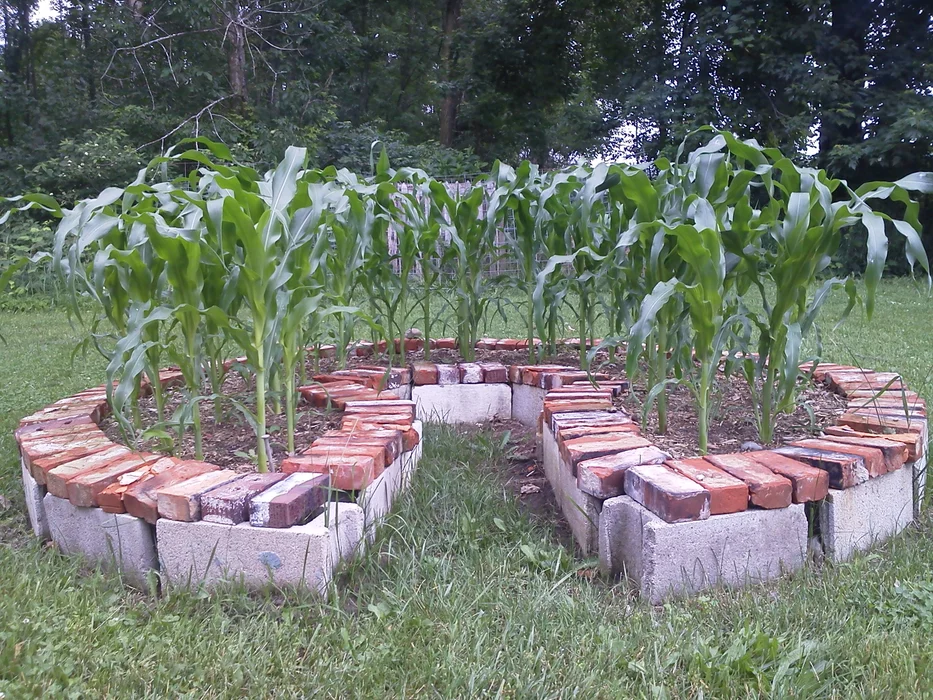
Step 10: So Far..
Pic taken on 6/26 sweet corn is doing well
Pic taken on 6/26 sweet corn is doing well
A PDF is available from Instructables at the link in Sources below..
^ Back